Learn more about our PHP Framework and the MVC programming model.
Do you know
how we code in PHP?
Learn more about our Bus Reservation System and how to utilize it more efficiently!
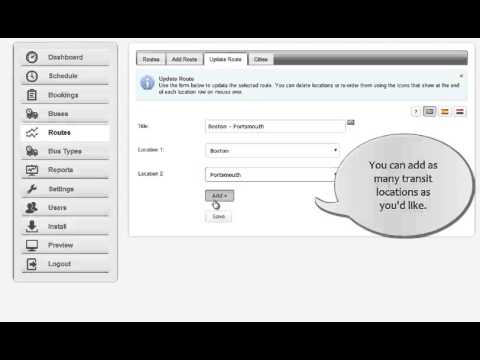
To start using the bus reservation system the first thing you need to do is to schedule bus routes. You can do that by going to the menu ROUTES. Then schedule the bus trip by specifying the start and the end point of the trip. You can add as many stops (transit locations) to any bus route.
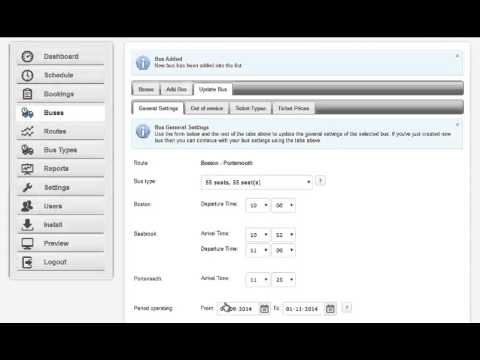
To create a bus timetable you need to go to BUSES, then click on ADD BUS tab. Add arrival & departure times, and the week dates the bus operates. You can manage the frequency/headway of the route by adding as many buses with same route but travelling at a different time during the day.
Please note that to add a BUS (as said above) you need to have BUS TYPES added already. See How to add BUS TYPES below.
How to install the bus ticketing system on my hosting account?
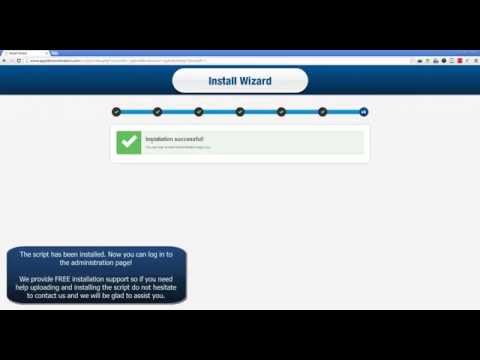
You can have the Bus Reservation System up and running on your website in just a few minutes. Once you purchase and download it you need to upload the on your server. An install wizard will guide you through the installation process. Watch the video to see how to install the script.
You can watch videos showing how to install on Wordpress and Joomla based websites here.
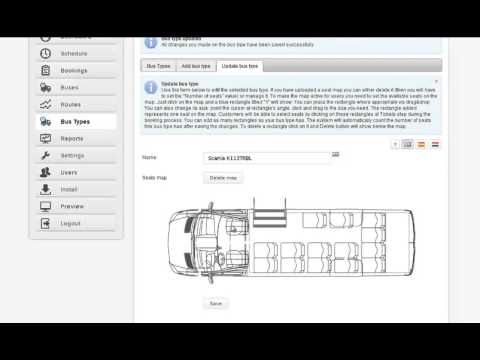
Adding an interactive seat map to your bus ticketing system is a simple task with our software. You just need to create a JPG Image of the bus seats.
After creating a seat map, go to BUS TYPES. If you have already added bus types, click on the pencil icon to edit them, otherwise click ADD BUS TYPE. Use the UPLOAD button to add the image. After uploading click on any seat to create a hotspot. The hot spots are the actual seats that users are able to book. You can remove spots or moving them on the graphic map by clicking on them.
How to see and print a BUS SCHEDULE, passenger and seat lists for a certain route?
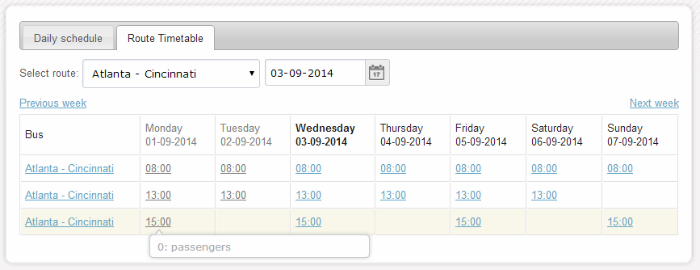
Once you are done creating bus schedule, you can see and print the the bus schedule under the SCHEDULE page. You can see a passenger and seat lists for a certain route by clicking on the arrow at the right of of each entry on the Daily Schedule page.
You can cancel a bus trip from the SCHEDULE page. From the Daily Schedule page find the trip you want to cancel and click the arrow at the right. You'll see the CANCEL BUS option.
Is it possible to let the buyer pay only a fraction of the price upon booking?
Yes, you can do that by setting a deposit payment per reservation. In this case the booker is required to pay a deposit percentage to confirm the booking. To set the required deposit payment, go to SETTINGS>BOOKING.
N.B. Make sure that the payments are turned on, otherwise deposit payment will not be possible.
You can choose whether you want bookers to pay or not for tickets while using your bus reservation system. You can disable payments and only collect reservations with your bus ticketing system or turn payments on and allow users to buy tickets online.
To manage payment settings go to SETTINGS>BOOKINGS. Find the DISABLE PAYMENTS option. Make sure to set the option with YES if you'd like to disable payments and NO if you'd like to accept payments.
Using the bus ticketing system you can create ticket templates and allow users to download tickets when purchasing. Go to SETTINGS>BOOKING>TICKET and use the editor to create ticket template. The available tokens help you personalize tickets.
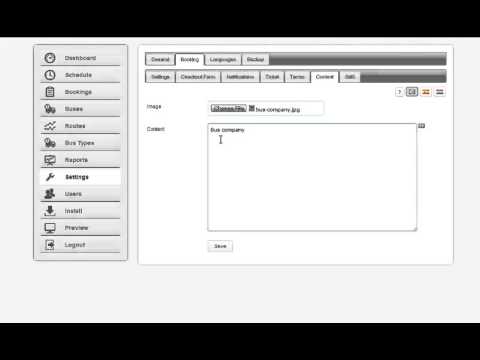
You can upload your own branded image and text on the front-end, as well as your own booking terms users must agree upon booking.
Add branded banner and content by going to: SETTINGS>BOOKING>CONTENT
Add your own booking terms at: SETTINGS>BOOKING>TERMS
You can translate the bus reservation system using the the admin. Make sure you have added the multi language support on the front-end. If not, see How to add multi language support on the front-end.
Once you do that, go to SETTINGS>LANGUAGES>TITLES and using the flag system at the upper right of the screen, make sure you replace the titles with the right translation.
IMPORT A LANGUAGE FILE: Under the Import/Export tab you can export the current language file, replace the relevant column with the proper titles. Import the new language file using again the Import/Export tab.
This is important when you need to re-install the script, because the new installations always come in the default English version. Make sure you export the translation before uninstalling the script.
Watch the video to see how to edit the default language using a simple language editor. All you need to do is to find a title, replace the text and hit the Save.
In order to send SMS, you need to set an API key at SETTINGS>BOOKING>SMS. Please note that the SMS service may require additional charges from an Web SMS Provider. Contact us to request an API key for your script...
Costomise the reservation form with the bus reservation system.
The Bus Reservation System supports both email and SMS reminders. You can customise the notifications under the Notifications tab in the Bookings page. (SETTINGS>BOOKING>NOTIFICATIONS). Select one of the tabs, To Customers or To Administrators, to edit the messages. You can use the tokens listed in the left box to personalize your emails and text messages.
Both the administrator and the clients receive the following notifications if set so:
- Automatic notifications triggered by certain events, such as booking or payment made.
- Text messages sent to user's phones.
N.B. In order to send SMS, you need to set an API key. See the above question too.
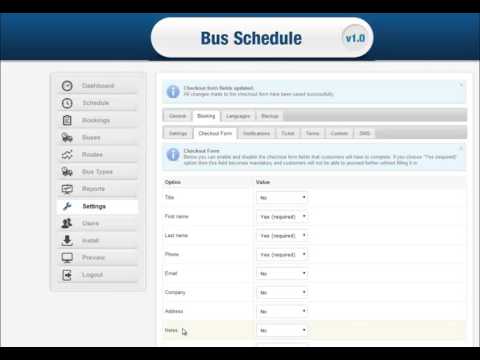
You can add/remove certain fields in the checkout form. To customise the reservation form, do the following:
1. Go to the SETTINGS page, the BOOKING tab.
2. Select the CHECKOUT FORM tab.
3. Use the drop-down menu to set a value for each of the available fields. Select Yes or No whether you want a field to be displayed or not, and Yes (Required) if you'd like that field to be mandatory. Click the SAVE button at the bottom of the page.
You may also rename the form fields by using the integrated Language module. To do that see How to translate the bus ticketing system using the admin?
N.B. If you'd like any other field added to the checkout form, you need to edit the source code. Note that this can be done only under the Developer License. You are not a developer? Contact us - we'll do it for you.
Editors can see all the main menus and options except the Settings, Install, Reports and Users. Editors have the ability to add and manage data but do not have access to the system settings. Only users with admin level of access can change the script settings and options.
The script supports the following payment options by default:
1) PayPal
2) Authorize.net
3) Bank account (for wire transfers)
4) Credit Card (for offline processing)
5) We can add more payment options to your reservation script upon request.
Can buyers pay with other than Paypal and Authorize.NET payment gateways?
Paypal and Authorize.NET are the only supported payment gateways at this moment. If you need any other payment gateways added to the your bus ticketing system, contact us and we'll add it for you.
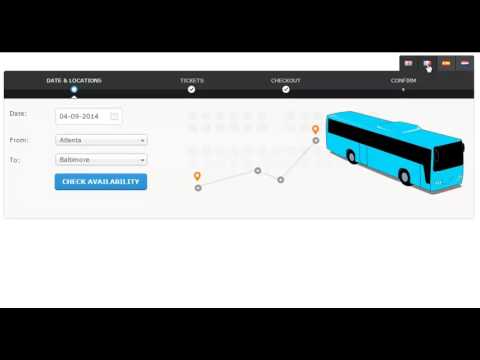
Once installed on your server, you can easily integrate the bus ticketing system on your website by using the integration code found in the Install page in the admin panel. You need to copy the code and paste into your HTML page.
To upload image and add your own description to the front-end, go to SETTINGS>BOOKING>CONTENT. From there you can upload your own image and add a description for your bookers.
You can backup and export the current database under the SETTINGS>BACKUP.